2011年11月7日 星期一

Android: Short Summary

The main component in Android Application
- Activity (UI components)
- Services (background code)
- Broadcast receivers (handler that responds to broadcast events)
- Content Providers (expose a data API to other application)

Addional compoent
- Views (UI elements)
- Layouts
(View hierarchies that control screen appearance)
- Intents (Messages wiring components together) 
- Resources (External data such as strings and drawables)
- Manifest (Configuration for applications)

Views
- SurfaceView (basic type that provides a direct drawing surface)
- ViewGroup (View that contain other Views)
- Widget (the classic UI components, e.g. Test input boxes, buttons)

Lifecycle
- onCreate
- onRestart
- onStart
- onResume
- onPause
- onStop
- onDestory
- onLowMemory
- onTerminate
- onConfigurationChanged

Process status
- Foreground
- Visible
- Service
- Background
- Empty

Layout
- FrameLayout
- RelativeLayout
- LinearLayout
- TableLayout
- AbsoluteLayout

Adapter
When you have to feed data from a data source to a view, you’ll use an Adapter
.
Intents and IntentFilters
IntentFilter - The Android platform keeps track of all the IntentFilter declarations that the current running system is capable of handling, and then resolves intents as they come in to the most suitable component dynamically, on the fly, at runtime.
Intents - provides in communicating between components, and sharing data between them.
        Intent intent = new Intent(Name);
        startActivity(intent);

        Intent intent = this.getIntent();

        Intent intent = new Intent(Intent.ACTION_VIEW);
        intent.setData(Uri.parse("http://www.google.com/"));
        startActivity(intent);

        Intent intent = new Intent(Intent.ACTION_WEB_SEARCH);
        intent.setData(Uri.parse("http://www.google.com/"));
        startActivity(intent);

        Intent intent = new Intent(Intent.ACTION_DIAL);
        activity.startActivity(intent);

        Intent intent = new Intent(Intent.ACTION_CALL);
        intent.setData(Uri.parse("tel:987-654-321"));
       startActivity(intent);


Container -

Thread -

Theme - Styles

Dialog -

Toast - Small rectanglar pop-up notification

Status bar -

Sliding drawer -

Notification bar -

Build-in Providers -

Directory structure

src/ - Java source code
gen/ - auto gen file (R.java)
asset/ - hold other static files
bin/ - compiled files
libs/ - holding third party Java JARs
res/ - resource such as icon, GUI layout,
AndroidManifest.xml

Size
5px is 5 pixels, 5dip is 5 density-independent pixels, or 5mm is 5 millimeter

Color

"#rgb", "#argb", "#rrggbb", or "#aarrggbb".
2011年11月3日 星期四

Android: ListView divider

A ListView divider is displayed between each ListView item.

The divider attribute can be either a color or a drawable graphic resource.

If a color is specified, then a horizontal line (whose thickness is configurable) will be displayed between items in the list.

If a drawable graphic resource is used, the graphic will appear between items.

    <ListView
        android:id="@+id/listView1"
        android:layout_width="fill_parent"
        android:layout_height="fill_parent"      
        android:divider="#F00"
        android:dividerHeight="1px">
    </ListView>

Android: Simple ListView (ArrayAdapter)

String[] items = { "Item 1","Item 2","Item 3","Item 4"};

ListView myListView = (ListView) findViewById(R.id.myListView);

ArrayAdapter<String> adapt = new ArrayAdapter<String>(this, android.R.layout.simple_list_item_1, items);

myListView.setAdapter(adapt);

Android: ListView (Cursor)

A ScrollView will work for a few dozen records. 
Use ListView for more records. 

In main layout XML
<ListView android:layout_height="fill_parent" android:layout_width="fill_parent" android:id="@+id/myListView" android:background="#6000" /> </LinearLayout>

Add another layout XML (row.xml)
<?xml version="1.0" encoding="utf-8"?>
<LinearLayout xmlns:android="
http://schemas.android.com/apk/res/android"
    android:layout_width="match_parent"
    android:layout_height="match_parent"
    android:orientation="horizontal" >

    <ImageView
        android:id="@+id/ItemImage"
        android:layout_width="wrap_content"
        android:layout_height="wrap_content"
        android:src="@drawable/ic_launcher" />

    <LinearLayout
        android:id="@+id/linearLayout1"
        android:layout_width="wrap_content"
        android:layout_height="match_parent"
        android:orientation="vertical" >

        <TextView
            android:id="@+id/ItemTitle"
            android:layout_width="wrap_content"
            android:layout_height="wrap_content"
            android:text="TextView" />

        <TextView
            android:id="@+id/ItemText"
            android:layout_width="wrap_content"
            android:layout_height="wrap_content"
            android:text="TextView" />
       
    </LinearLayout>

</LinearLayout>

Create SimpleCursorAdapter to describe a single row of data
static final String[] FROM = { DbHelper.C_CREATED_AT, DbHelper.C_USER, DbHelper.C_TEXT }; //
static final int[] TO = { R.id.textCreatedAt, R.id.textUser, R.id.textText };
Cursor cursor; //

cursor = db.query(DbHelper.TABLE, null, null, null, null, null, DbHelper.C_CREATED_AT + " DESC");
adapter = new SimpleCursorAdapter(this, R.layout.row, cursor, FROM, TO); //
myViewList.setAdapter(adapter);

Android: ScrollView

In XML add:
<ScrollView android:layout_height="fill_parent" android:layout_width="fill_parent">
<TextView android:layout_height="fill_parent" android:layout_width="fill_parent" android:id="@+id/myText" android:background="#6000" />
</ScrollView>


In Activity onCreate
myList = (TextView) findViewById(R.id.myText);

In your program
myList.append("Item");

2011年11月1日 星期二

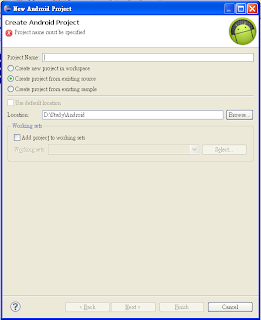
Android: How to Import a Non-Eclipse Project

- File > New > Project... from the Eclipse main menu
- Then, choose Android > Android Project from the tree of available project
types.
- Then, choose the "Create project from existing source" radio button,
- click the [Browse...] button, and open the directory containing your project's AndroidManifest.xml file.
- click next and specify a build target from the table.
- Then, click [Finish].

Do not use the import from main File menu.