2011年11月7日 星期一

Android: Short Summary

The main component in Android Application
- Activity (UI components)
- Services (background code)
- Broadcast receivers (handler that responds to broadcast events)
- Content Providers (expose a data API to other application)

Addional compoent
- Views (UI elements)
- Layouts
(View hierarchies that control screen appearance)
- Intents (Messages wiring components together) 
- Resources (External data such as strings and drawables)
- Manifest (Configuration for applications)

Views
- SurfaceView (basic type that provides a direct drawing surface)
- ViewGroup (View that contain other Views)
- Widget (the classic UI components, e.g. Test input boxes, buttons)

Lifecycle
- onCreate
- onRestart
- onStart
- onResume
- onPause
- onStop
- onDestory
- onLowMemory
- onTerminate
- onConfigurationChanged

Process status
- Foreground
- Visible
- Service
- Background
- Empty

Layout
- FrameLayout
- RelativeLayout
- LinearLayout
- TableLayout
- AbsoluteLayout

Adapter
When you have to feed data from a data source to a view, you’ll use an Adapter
.
Intents and IntentFilters
IntentFilter - The Android platform keeps track of all the IntentFilter declarations that the current running system is capable of handling, and then resolves intents as they come in to the most suitable component dynamically, on the fly, at runtime.
Intents - provides in communicating between components, and sharing data between them.
        Intent intent = new Intent(Name);
        startActivity(intent);

        Intent intent = this.getIntent();

        Intent intent = new Intent(Intent.ACTION_VIEW);
        intent.setData(Uri.parse("http://www.google.com/"));
        startActivity(intent);

        Intent intent = new Intent(Intent.ACTION_WEB_SEARCH);
        intent.setData(Uri.parse("http://www.google.com/"));
        startActivity(intent);

        Intent intent = new Intent(Intent.ACTION_DIAL);
        activity.startActivity(intent);

        Intent intent = new Intent(Intent.ACTION_CALL);
        intent.setData(Uri.parse("tel:987-654-321"));
       startActivity(intent);


Container -

Thread -

Theme - Styles

Dialog -

Toast - Small rectanglar pop-up notification

Status bar -

Sliding drawer -

Notification bar -

Build-in Providers -

Directory structure

src/ - Java source code
gen/ - auto gen file (R.java)
asset/ - hold other static files
bin/ - compiled files
libs/ - holding third party Java JARs
res/ - resource such as icon, GUI layout,
AndroidManifest.xml

Size
5px is 5 pixels, 5dip is 5 density-independent pixels, or 5mm is 5 millimeter

Color

"#rgb", "#argb", "#rrggbb", or "#aarrggbb".
2011年11月3日 星期四

Android: ListView divider

A ListView divider is displayed between each ListView item.

The divider attribute can be either a color or a drawable graphic resource.

If a color is specified, then a horizontal line (whose thickness is configurable) will be displayed between items in the list.

If a drawable graphic resource is used, the graphic will appear between items.

    <ListView
        android:id="@+id/listView1"
        android:layout_width="fill_parent"
        android:layout_height="fill_parent"      
        android:divider="#F00"
        android:dividerHeight="1px">
    </ListView>

Android: Simple ListView (ArrayAdapter)

String[] items = { "Item 1","Item 2","Item 3","Item 4"};

ListView myListView = (ListView) findViewById(R.id.myListView);

ArrayAdapter<String> adapt = new ArrayAdapter<String>(this, android.R.layout.simple_list_item_1, items);

myListView.setAdapter(adapt);

Android: ListView (Cursor)

A ScrollView will work for a few dozen records. 
Use ListView for more records. 

In main layout XML
<ListView android:layout_height="fill_parent" android:layout_width="fill_parent" android:id="@+id/myListView" android:background="#6000" /> </LinearLayout>

Add another layout XML (row.xml)
<?xml version="1.0" encoding="utf-8"?>
<LinearLayout xmlns:android="
http://schemas.android.com/apk/res/android"
    android:layout_width="match_parent"
    android:layout_height="match_parent"
    android:orientation="horizontal" >

    <ImageView
        android:id="@+id/ItemImage"
        android:layout_width="wrap_content"
        android:layout_height="wrap_content"
        android:src="@drawable/ic_launcher" />

    <LinearLayout
        android:id="@+id/linearLayout1"
        android:layout_width="wrap_content"
        android:layout_height="match_parent"
        android:orientation="vertical" >

        <TextView
            android:id="@+id/ItemTitle"
            android:layout_width="wrap_content"
            android:layout_height="wrap_content"
            android:text="TextView" />

        <TextView
            android:id="@+id/ItemText"
            android:layout_width="wrap_content"
            android:layout_height="wrap_content"
            android:text="TextView" />
       
    </LinearLayout>

</LinearLayout>

Create SimpleCursorAdapter to describe a single row of data
static final String[] FROM = { DbHelper.C_CREATED_AT, DbHelper.C_USER, DbHelper.C_TEXT }; //
static final int[] TO = { R.id.textCreatedAt, R.id.textUser, R.id.textText };
Cursor cursor; //

cursor = db.query(DbHelper.TABLE, null, null, null, null, null, DbHelper.C_CREATED_AT + " DESC");
adapter = new SimpleCursorAdapter(this, R.layout.row, cursor, FROM, TO); //
myViewList.setAdapter(adapter);

Android: ScrollView

In XML add:
<ScrollView android:layout_height="fill_parent" android:layout_width="fill_parent">
<TextView android:layout_height="fill_parent" android:layout_width="fill_parent" android:id="@+id/myText" android:background="#6000" />
</ScrollView>


In Activity onCreate
myList = (TextView) findViewById(R.id.myText);

In your program
myList.append("Item");

2011年11月1日 星期二

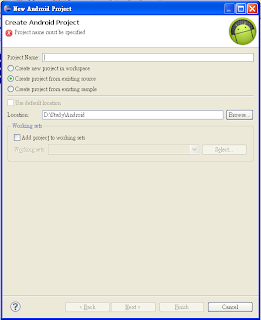
Android: How to Import a Non-Eclipse Project

- File > New > Project... from the Eclipse main menu
- Then, choose Android > Android Project from the tree of available project
types.
- Then, choose the "Create project from existing source" radio button,
- click the [Browse...] button, and open the directory containing your project's AndroidManifest.xml file.
- click next and specify a build target from the table.
- Then, click [Finish].

Do not use the import from main File menu.

2011年10月31日 星期一

Android: How to Import the Android samples code

In Eclipse:
File -> New Project -> Android -> Android Sample Project

Android: Writing a Simple 2D Program.

1. Create a new Project.

2. Add a new View (SurfaceView) Class. (File -> New -> Class)


3. Add Constructor in the new Class.
 public Panel(Context context) {
  super(context);
  // TODO Auto-generated constructor stub
 }

4. Change Activity
 setContentView(R.layout.main);
to your new Class
 setContentView(new Panel(this));

5a. Add the onDraw for View
@Override
public void onDraw(Canvas canvas) {
    canvas.drawColor(Color.BLACK);
    canvas.drawBitmap(mBitmap, 10, 10, null);
}

5b. Add the Callback interface and Thread for SurfaceView
public class Panel extends SurfaceView implements SurfaceHolder.Callback {
 private AnimationThread mThread;
 
 public Panel(Context context) {
  super(context);
  // TODO Auto-generated constructor stub
     getHolder().addCallback(this);
     mThread = new AnimationThread(this);
 }
    @Override
    public void surfaceChanged(SurfaceHolder holder, int format, int width, int height) {
        // TODO Auto-generated method stub
    }
 
     @Override
    public void surfaceCreated(SurfaceHolder holder) {
        // TODO Auto-generated method stub
         if (!mThread.isAlive()) {
             mThread = new AnimationThread(this);
             mThread.setRunning(true);
             mThread.start();
         }
    }
 
    @Override
    public void surfaceDestroyed(SurfaceHolder holder) {
        // TODO Auto-generated method stub
        if (mThread.isAlive()) {
            mThread.setRunning(false);
        }
    }
    public void doDraw(Canvas canvas) {
        canvas.drawColor(Color.WHITE);
    }
}
public class AnimationThread extends Thread {
 public AnimationThread() {
  // TODO Auto-generated constructor stub
 }
    private Panel mPanel;
    private SurfaceHolder mHolder;
    private boolean mRun = false;

    public AnimationThread(Panel panel) {
        mPanel = panel;
        mHolder = mPanel.getHolder();
    }

    public void setRunning(boolean run) {
        mRun = run;
    }

    @Override
    public void run() {
        Canvas canvas = null;
        while (mRun) {
            canvas = mHolder.lockCanvas();
            if (canvas != null) {
                mPanel.doDraw(canvas);
                mHolder.unlockCanvasAndPost(canvas);
            }
        }
    }
}

Android: Adding style to a text (bold italic etc..)

import android.text.Html;

MyTest.setText(Html.fromHtml("<BIG><B>BIG BOLD</B></BIG><SMALL><I>Small italic</I></SMALL>Normal<BR>" );

Some Notes about Android APPs programming

Random number
import java.util.Random;
private static final Random rand = new Random();
rand.nextInt(xxx);
nextInt(int n) - Returns a pseudo-random uniformly distributed int in the half-open range [0, n).

Math Lab
import java.lang.Math;
Math.pow();

Create new class
In Eclipse, choose File → New → Class.
Type Class Name
Superclass
android.appActivity
android.database.sqlite.SQLiteOpenHelper
and check the box for “Constructors from superclass.”

android:textcolor
A color value, in the form of "#rgb", "#argb", "#rrggbb", or "#aarrggbb".
Example:
android:textcolor="#000"  or "#000000" => BLACK
android:textcolor="#FFF" or "#FFFFFF"  => WHITE
android:textcolor="#F00" or "#FF0000"  => RED
android:textcolor="#0F0" or #00FF00"  => GREEN
android:textcolor="#00F" or "#0000FF"  => BLUE


Android SurfaceView
1. Add new SurfaceView Class

2. Add new Thread Class name

3. Add code in the Thread
Override run()
4. Add code in the SurfaceView
Override surfaceCreated & surfaceDestroyed

Android Rotate Text
@Override
 public void onDraw(Canvas c) {
  super.onDraw(c);
// ........,.
  // Draw Rotated text
  paint.setColor(Color.RED); 
  paint.setTextSize(30); 
  String rotate_str = "Rotate TEXT";
  // rotate the canvas on center of the text to draw 
  c.rotate(45, 50, 50);  // rotate 45 at x = 50 and y = 50
  // draw the rotated text 
  paint.setStyle(Paint.Style.FILL); 
  c.drawText(rotate_str, 50, 50, paint); 
  //undo the rotate 
  c.restore();
// ..........

Android Draw using View Class
MyView.java
package com.hong.testing;
import android.app.Activity;
import android.os.Bundle;
public class MyView extends Activity {
    /** Called when the activity is first created. */
    @Override
    public void onCreate(Bundle savedInstanceState) {
        super.onCreate(savedInstanceState);
        setContentView(new Panel(this));    }
}
panel.java
package com.hong.testing;
import android.content.Context;
import android.graphics.Bitmap;
import android.graphics.BitmapFactory;
import android.graphics.Canvas;
import android.graphics.Color;
import android.graphics.Paint;
import android.graphics.Rect;
import android.view.View;
class Panel extends View {

 public Panel(Context context) {
  super(context);
 }

 @Override public void onDraw(Canvas c) {
  super.onDraw(c);
  Paint paint = new Paint(); 
  paint.setStyle(Paint.Style.FILL);
  // make the entire canvas white 
  paint.setColor(Color.WHITE); 
  c.drawPaint(paint);

     // Draw Line     paint.setColor(Color.LTGRAY);
     paint.setStrokeWidth(3);
     paint.setColor(Color.LTGRAY);
     c.drawLine(0, 0, c.getWidth()-1, c.getHeight()-1, paint);
     c.drawLine(c.getWidth()-1, 0,0 , c.getHeight()-1, paint);
  // Put Bitmap  Bitmap bitmap = BitmapFactory.decodeResource(getResources(), R.drawable.icon);
     c.drawBitmap(bitmap, 10, 10, null);
   
  // Draw a blue circle  paint.setAntiAlias(true); 
  paint.setColor(Color.BLUE); 
  c.drawCircle(20, 20, 10, paint);  // x = 20, y = 20 radius = 10
  // Draw a green rectangle  paint.setColor(Color.GREEN); 
  c.drawRect(35, 10, 60, 30, paint); // x1 = 35, y1 = 10, x2 = 60, y2 = 30

  // Draw red text   paint.setColor(Color.RED); 
  paint.setStyle(Paint.Style.FILL); 
  paint.setAntiAlias(true); 
  paint.setTextSize(30); 
  c.drawText("Text Drawing", 30, 100, paint);
  }   
}

Some notes about Android APPs

Android Tools
Android Tools are located in the following directory. (e.g. adb)
C:\Program Files\Android\android-sdk\platform-tools
C:\Program Files\Android\android-sdk\tools

Android locatiziation
Examples for locatiziation setting
 res/drawable
 res/drawable-hdpi
 res/drawable-ldpi
 res/drawable-mdpi
 res/drawable-nodpi
 res/drawable-de
 res/drawable-de-rCH
 res/drawable-fr-rFR
 res/drawable-fr-rCA
 res/drawable-en-rCA
 res/drawable-ja-rJP
 res/drawable-en-rUS

 res/layout
 res/layout-land

 res/values
 res/values-de/strings.xml
 res/values-fr/strings.xml
 res/values-ja/strings.xml

Some Notes about Android AndroidManifest.xml

Android Light Theme
Add in AndroidManifest.xml
        <activity android:name=".MathCal"
                  android:label="@string/app_name"
                  android:screenOrientation="portrait"
                  android:theme="@android:style/Theme.Light">
            <intent-filter>

Android Screen Orientation
<activity android:name=".MathCal"
              android:label="@string/app_name"
              android:screenOrientation="landscape"
              >
android:screenOrientation=["unspecified" | "user" | "behind" | "landscape" | "portrait" | "sensor" | "nosensor"]

Enabling the Android Move To SD Card Feature
Edit the AndroidManifest.xml file of the application to add an entry for “android:installLocation” to the <manifest> tag:
<manifest xmlns:android="http://schemas.android.com/apk/res/android" ......... android:installLocation="auto">
Keep the “minSdkVersion” the same as before; it need not be 8 to match Android 2.2

Android APPS without Title / Fullscreen
If you want your Anddroid APPS without tilte, change androidmanifest.xml  Theme
android:theme="@android:style/Theme.NoTitleBar"
If you want your Android APPS without tilte and fullscreen, change androidmanifest.xml Theme
android:theme="@android:style/Theme.NoTitleBar.Fullscreen"

My Samsung Galaxy ACE

My Phone
Version 2.3.4 GINGERBREAD.ZSKPD

Recovery Mode
- Holding the Middle button and then Power On the device.

Screenshots
- Press the right soft key (back button)
- While holding step one, press the centre button (physical key)
- The images will going to your SD card folder called “ScreenCapture”.

Change Input Mode
- Tap and hold the text input field and select Input method

How to force install apps to SD card without ROOT
- "cd C:\android-sdk-windows\platform-tools"
- "adb devices"
- "adb shell"
    A $ sign should pop up
- "pm setInstallLocation 2"
    Another $ should pop up

SVN Software

When we want to download some source code, we need to use SVN.

I have tried Tortoise SVN and it is integrated into the Windows explorer.

To use it, open the explorer and right-click on the folder you like and find "SVN Checkout".

APK Tools

APKTOOL

DEX2JAR

JD-GUI